The Intel Movidius Neural Compute Stick (NCS) is a neural network computation engine in a USB stick form factor. It’s based on the Myriad-2 chip, referred to by Movidius as a VPU or Visual Processing Unit, basically a processor that was specifically designed to accelerate neural network computations, and with relatively low power requirements. The NCS is a great match for single board computers like the Raspberry Pi, the Beagle Bone and especially the PYNQ-Z1. Now these boards can all run software based neural networks, but not very quickly, so their potential in fast moving applications is limited. When paired with a Movidius NCS, they can achieve tremendously better inference times by offloading all of the heavy neural network computation to the Myriad chip.
So why do I think that the NCS is an especially good fit for the PYNQ-Z1? These days AI and neural networks are finding new uses in many applications but one of the biggest and fastest growing ones is computer vision. The PYNQ-Z1 is one of the best platforms available today for developing embedded vision applications and here’s why: it’s got both a HDMI input and a HDMI output, and it’s got FPGA fabric that you can use to hardware accelerate image processing algorithms (among other things). So I figured that it would be a good idea to try matching these up and seeing what kind of interesting things I could demo.
One other thing before we get started… you might ask yourself: why wouldn’t you accelerate the neural network on the FPGA fabric of the Zynq? Well that would be the ideal way to do it on the PYNQ-Z1 board, and by the way Xilinx has already done it (see the QNN and BNN projects). Unfortunately, neural networks are very resource heavy and the PYNQ-Z1 has one of the lower-cost Zynq devices on it, with FPGA resources that are probably a bit limited for neural networks (that’s a very generalized statement but it obviously depends on what you want the network to do). In my opinion, a better use of the FPGA resources of the PYNQ-Z1 would be for image processing to support an externally implemented neural network, such as the NCS.
Setup the hardware
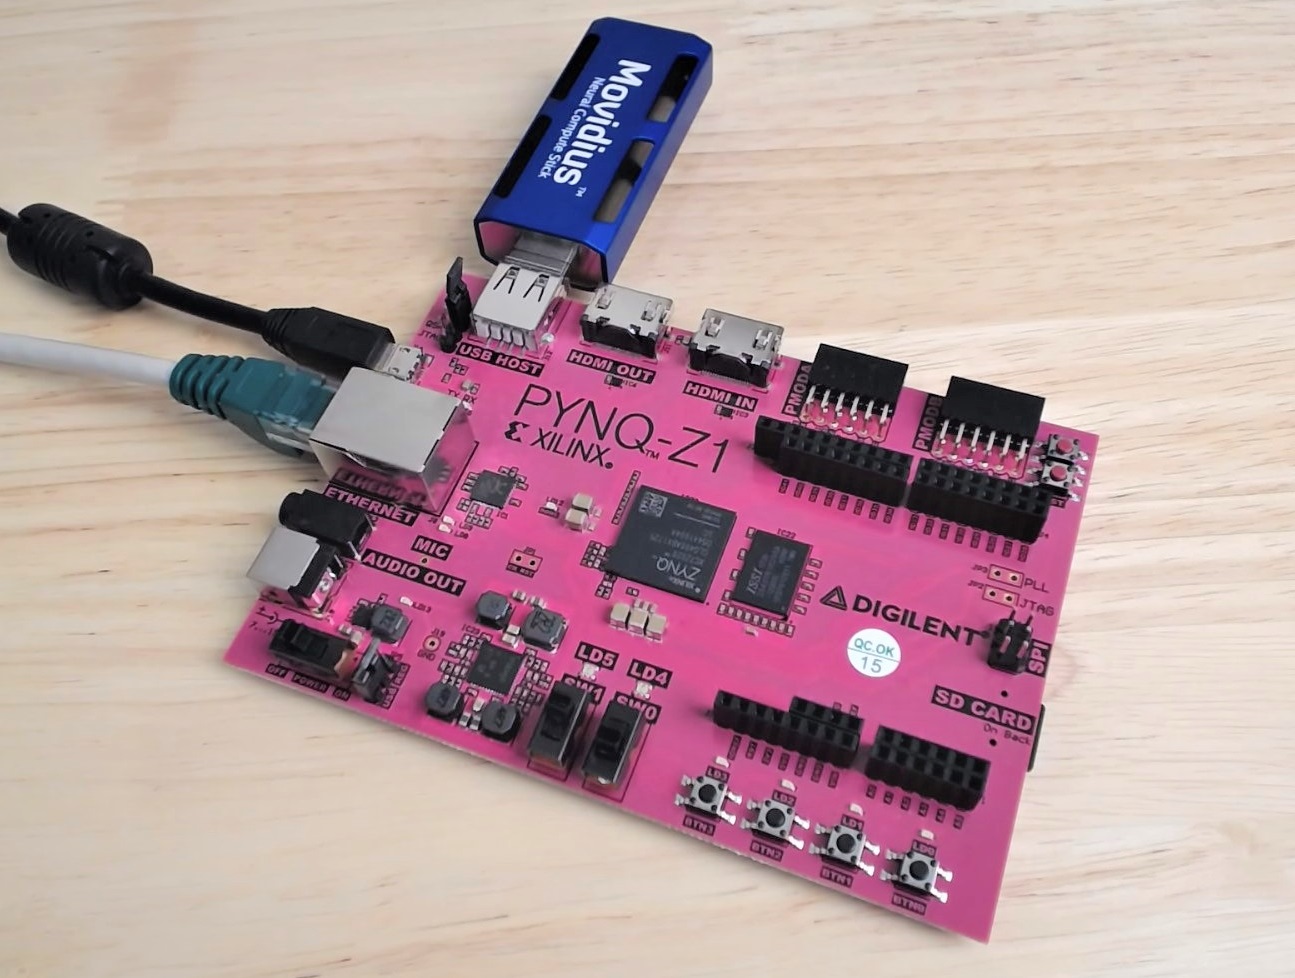
Firstly, you want to connect the Movidius NCS to the PYNQ-Z1 board, but to do this, you’re going to need a powered USB hub. The key word is “powered”, because you’ll find that the PYNQ-Z1 alone can’t quite supply enough current to the NCS. I tried it first without a USB hub, and I found that the PYNQ-Z1 wouldn’t even boot up. Yes, the image at the top of this post is misleading but it’s simpler and it got you interested, didn’t it?
Setup the SD card of the PYNQ-Z1
You’ll need to install a lot of Linux and Python packages onto your PYNQ-Z1, so I suggest that you use a separate SD card for your PYNQ-NCS projects. So with a brand new SD card, follow my previous video tutorial to write the precompiled PYNQ image to it using Win32DiskImager.
Install the dependencies
Power up the PYNQ-Z1, then when the LEDs flash, open up a web browser to access Jupyter (http://pynq:9090). Login to Jupyter using the password “xilinx” and then select New->Terminal from the drop down menu on the right hand side of the screen. From this Linux terminal, you will then install the dependencies using the following commands. Note that you should already be logged in as the root, so you shouldn’t need to use “sudo” with these commands:
apt-get install -y libprotobuf-dev libleveldb-dev libsnappy-dev
apt-get install -y  libopencv-dev libhdf5-serial-dev
apt-get install -y protobuf-compiler byacc libgflags-dev
apt-get install -y libgoogle-glog-dev liblmdb-dev libxslt-dev
To save you time, these commands only install the packages that are not already built into the precompiled PYNQ-Z1 image. If you’re not starting from the standard PYNQ-Z1 image, then you might be better off installing all of the dependencies as shown in the Movidius guide for the Raspberry Pi (they are the same for the PYNQ-Z1).
Install the NC SDK (in API-only mode)
The NC SDK contains a Toolkit and API. The Toolkit is used for profiling, compiling and tuning neural networks, while the API is used to connect applications with the NCS. To keep the installation light on the PYNQ-Z1, we only want to install the API. We’d normally install the Toolkit on a development PC, although I wont go into those details in this post. The terminal in Jupyter normally leaves you in the /home/xilinx directory. You can run the following commands from that directory to download the NC SDK and NC App Zoo.
mkdir workspace
cd workspace
git clone https://github.com/movidius/ncsdk
git clone https://github.com/movidius/ncappzoo
Now we move into the API source directory.
cd ncsdk/api/src
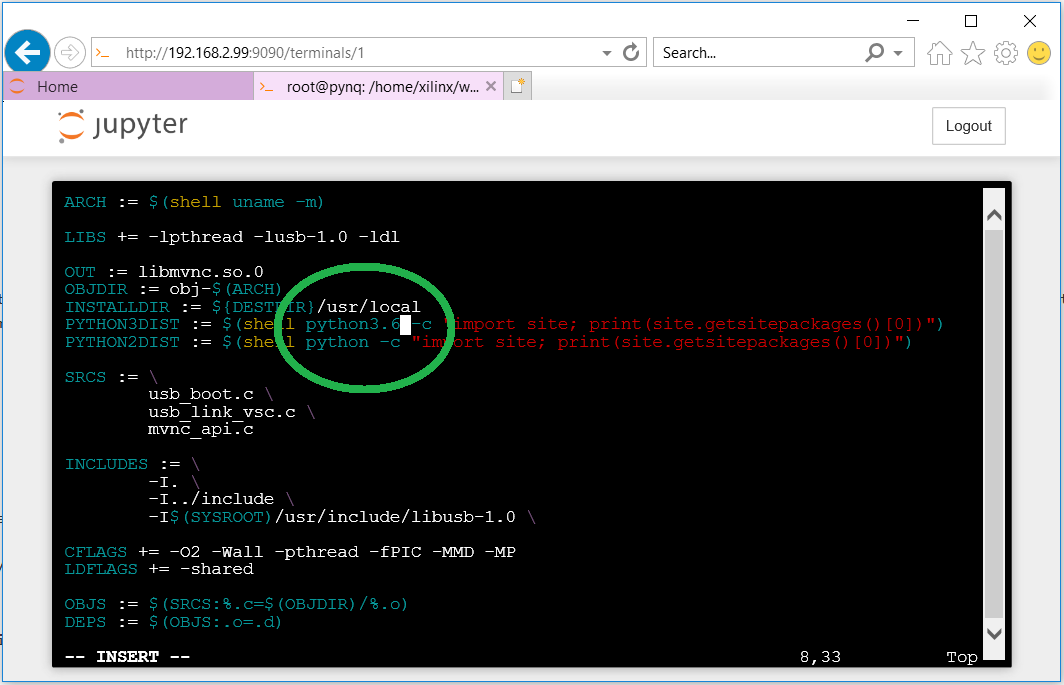
In this directory there is a Makefile for compiling and installing the API. We will need to make a small modification to it so that it installs the Python libraries to Python 3.6 and not Python 3.5. Open the Makefile for editing using the vi editor.
vi Makefile
Once in the vi editor, press i to start inserting text. Use the arrows to navigate down to the reference to “python3”, position the cursor to the end of it and add .6 to the end of that reference (it should read python3.6). Then press ESC to get out of insert mode and type “:x” (colon then x) and press ENTER to save the file. 
Now we can compile and install the API.
make
make install
Install the NC App Zoo
The NC App Zoo contains lots of example applications that you can learn from. We’re going to use one of them to do a simple test with our NCS.
cd ../../../ncappzoo/apps/hello_ncs_py
Again here we are going to have to modify the Makefile in this directory and replace the reference to python3 with python3.6. Open the Makefile in the vi editor and make the change.
vi Makefile
Now we can run the example.
make run
You should see the following output:
making run
python3.6 hello_ncs.py;
Hello NCS! Device opened normally.
Goodbye NCS! Device closed normally.
NCS device working.
Test the YOLO project for PYNQ-Z1
Now we can try out the YOLO project for PYNQ-Z1 and use a pre-built graph file (normally we would have to compile the graph file on our development PC with the NC Toolkit). Let’s start by cloning the YOLO for PYNQ-Z1 project.
cd /home/xilinx/jupyter_notebooks
git clone https://github.com/fpgadeveloper/pynq-ncs-yolo.git
Then we download the prebuilt graph file.
cd pynq-ncs-yolo
wget "http://files.fpgadeveloper.com/downloads/2018_04_19/graph"
Now we can run the YOLO single image example.
cd py_examples
python3.6 yolo_example.py ../graph ../images/dog.jpg ../images/dog_output.jpg
You should get this output:
Device 0 Address: 1.4 - VID/PID 03e7:2150
Starting wait for connect with 2000ms timeout
Found Address: 1.4 - VID/PID 03e7:2150
Found EP 0x81 : max packet size is 512 bytes
Found EP 0x01 : max packet size is 512 bytes
Found and opened device
Performing bulk write of 865724 bytes...
Successfully sent 865724 bytes of data in 211.110297 ms (3.910841 MB/s)
Boot successful, device address 1.4
Found Address: 1.4 - VID/PID 03e7:f63b
done
Booted 1.4 -> VSC
total time is " milliseconds 285.022
(768, 576)
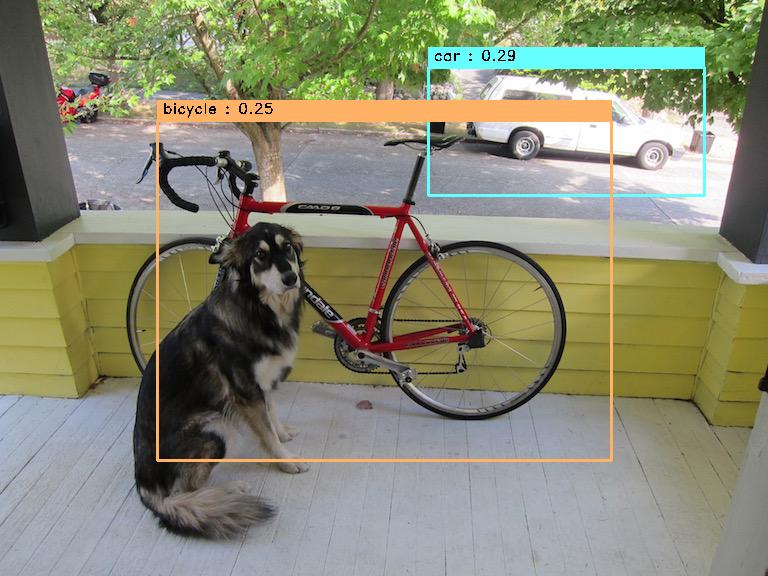
    class : car , [x,y,w,h]=[566,131,276,128], Confidence = 0.29101133346557617
    class : bicycle , [x,y,w,h]=[384,290,455,340], Confidence = 0.24596166610717773
root@pynq:/home/xilinx/jupyter_notebooks/pynq-ncs-yolo/py_examples#
In Jupyter, you will be able to browse through to the output image and view it (/pynq-ncs/yolo/images/dog_output.jpg).

So now you should be setup and able to run the Jupyter notebooks in the YOLO for PYNQ-Z1 project. Checkout a demo of one of the notebooks in this video.
In the video we get about 3fps when we don’t do any resize operation in software. When we do resizing in software the frame rate drops to about 1.5fps. If we offloaded the resize operation to the FPGA we’d get that frame rate back up to 3fps and we should be able to boost that to 6fps if we use threading and the second processor in the Zynq-7000 SoC, but I’ll leave that for another video.
