In this post we’re going to install PetaLinux 2020.1 from scratch on a virtual machine running Ubuntu 18.04.4 64-bit. The workstation on which I will be doing this has an Intel Xeon, 64GB RAM and 3TB HDD running Windows 10 64-bit. I’m assuming that your host machine is also running Windows.
Why run PetaLinux on a virtual machine?
Here are the main advantages to using PetaLinux on a virtual machine:
- Easy to keep working setups for multiple versions of PetaLinux. Although you can install multiple versions of PetaLinux side-by-side on the same machine, in time the dependencies can change or be updated, rendering older versions unstable. With VMs you can keep a working setup for each version of PetaLinux that you need to support.
- Practical if you don’t have a spare physical machine to dedicate to the specific requirements of the PetaLinux tools. For one, PetaLinux runs on Linux, and secondly it has a bunch of dependencies that you may not want to install on your main workstation.
Step 1: Create the Virtual Machine
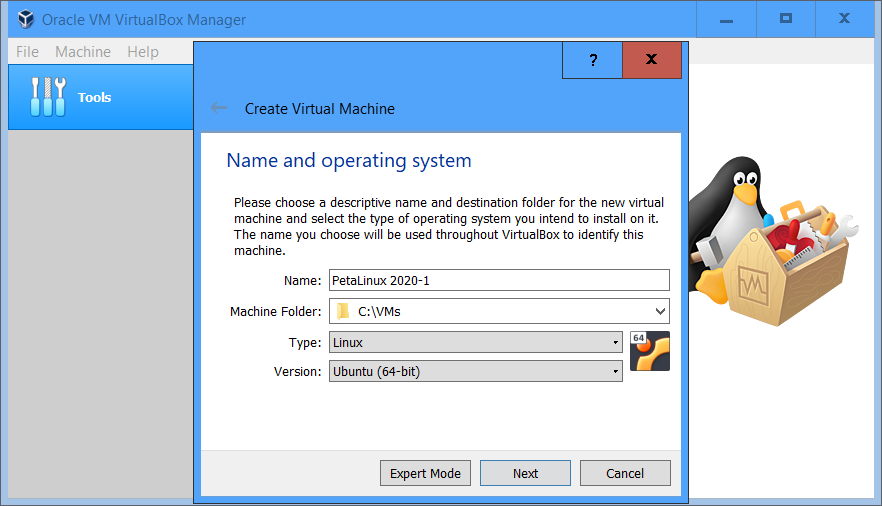
- Download, install and launch VirtualBox from here.
- Create a new virtual machine using these options:
- Linux
- Ubuntu 64-bit
- 16 GB RAM (8GB minimum according to user guide)
- VirtualBox Disk Image
- Dynamic (resizable) hard disk
- 200 GB size (the resulting VM will have about 113GB free after all of these installs so you can reduce this if you like)
I recommend using the dynamic type of hard disk because the Xilinx tools use up a lot of space, BSPs can take up a couple of GB each, plus PetaLinux projects use up a lot of space typically, so it’s hard to know exactly how much space you will end up needing. If you go with a fixed size HDD, you can’t change it easily with VirtualBox, so I say go with the dynamic.
Step 2: Install Ubuntu 18.04.4 LTS onto the VM
Before launching the VM, we need to have the Ubuntu installation boot disk (or at least the ISO). According to the PetaLinux 2020.1 reference guide, the latest supported Ubuntu release is 18.04.4 (64-bit), so that’s what we’ll install on our VM.
- Download Ubuntu 18.04.4 install ISO here
- Once the download completes, open up an explorer window at the ISO file location and then double
click the
.isofile. Windows should automatically mount that ISO file to it’s own drive letter, in my caseF:. You will be able to refer to this drive letter to install Ubuntu on the VM.
-
Back in VirtualBox, click on the VM we created earlier and click “Start”. You will be asked to select the drive letter of your Ubuntu installation disk. Select either your DVD drive letter, or the ISO file’s drive letter.
-
Ubuntu installer will run. Use these options:
- Install Ubuntu
- Normal installation
- DON’T Download updates while installing Ubuntu
As PetaLinux requires Ubuntu 18.04.4 (and doesn’t support 18.04.5), we need to refuse the updates all the way through the install process and on the first boot.
-
After installation, you will be asked to reboot. If you used a DVD, the DVD will be automatically ejected from the drive. If you used the ISO file directly, it will ask you to remove the boot disk. To do this, open Windows Explorer, find the drive for the mounted ISO file, then right click on it and select “Eject”. The ISO will be unmounted and you will be able to continue the Ubuntu boot.
-
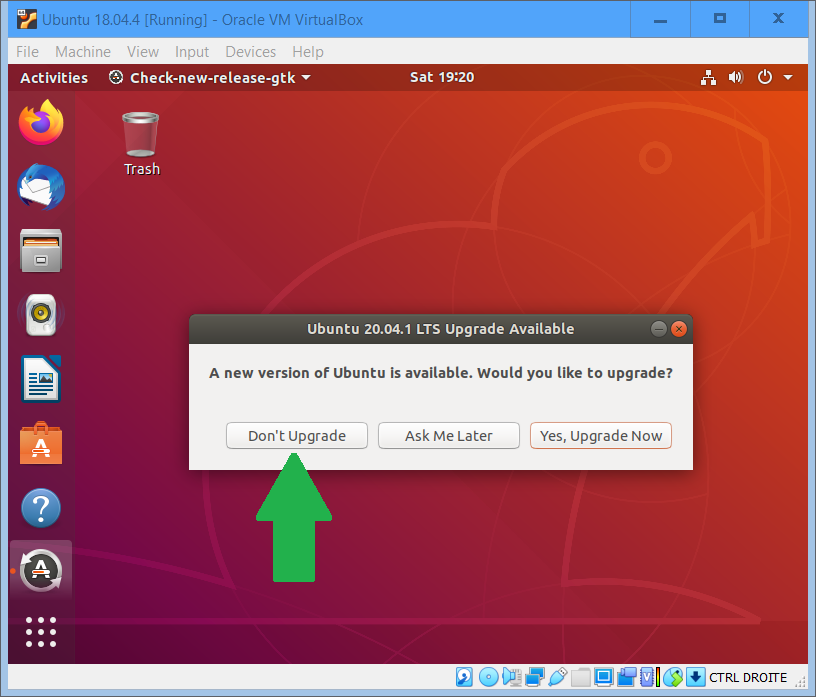
When Ubuntu has booted and you are logged in, it will tell you that Ubuntu 2020.04 is available and ask if you want to install it. Be sure to refuse the update.
Sharing files from host to VM
At this point I like to setup the VM so that I can share files from the host machine. The best way to do this is by using VirtualBox Guest Additions, which is software that needs to be installed on the VM after the OS.
- After logging into Ubunto on the VM, click the menu option “Devices->Insert Guest Additions CD image”.
- This will mount the Guest Additions installation ISO to Ubuntu and you will be asked if you want to run the installation. Answer yes.
- Once Guest Additions is installed, you can now go into the “Machine->Settings” and then the “Shared Folders” tab.
- Click the “Add new shared folders” icon and select a folder on your host machine to share with the VM. It helps to tick the “Auto-mount” option.
- Since you’ve got Guest Additions installed, it can be useful to enable “Shared Clipboard” and “Drag’n’Drop” from the “General” tab under “Advanced”.
Step 3: Install Vitis
This is a good point to install Vitis 2020.1 on the VM, although it’s not absolutely necessary so you can skip this step if you wont be needing it.
- From the VM, open Firefox and download Vitis Unified Installer 2020.1 (All OS installer Single-File Download) from the Xilinx website here.
- By default, the
Xilinx_Unified_2020.1_0602_1208.tar.gzfile will be in your~/Downloadsdirectory. Assuming that it is in the~/Downloadsdirectory, extract the installer and then run it.
tar xvzf ~/Downloads/Xilinx_Unified_2020.1_0602_1208.tar.gz -C ~/Downloads/.
cd ~/Downloads/Xilinx_Unified_2020.1_0602_1208/
./xsetup
- During the installation, you will be told that there are newer versions available. Make sure that you refuse these upgrades (2020.1.1 or 2020.2+) unless you actually want those versions. To avoid problems down the line, you’re best to use Vitis 2020.1 with PetaLinux 2020.1.
Step 4: Install PetaLinux dependencies
- Open a terminal and then run the following command to install all of the PetaLinux 2020.1 dependencies:
sudo apt-get -y install iproute2 \
gcc \
g++ \
net-tools \
libncurses5-dev \
zlib1g:i386 \
libssl-dev \
flex \
bison \
libselinux1 \
xterm \
autoconf \
libtool \
texinfo \
zlib1g-dev \
gcc-multilib \
build-essential \
screen \
pax \
gawk \
python3 \
python3-pexpect \
python3-pip \
python3-git \
python3-jinja2 \
xz-utils \
debianutils \
iputils-ping \
libegl1-mesa \
libsdl1.2-dev \
pylint3 \
cpio
Step 5: Install PetaLinux
- From the VM, open up Firefox browser and download the PetaLinux 2020.1 Installer
from the Xilinx website here. By default, the installer should end up in the
~/Downloadsdirectory and the following commands will assume that it is there. - In the terminal, make the installer executable:
chmod +x ~/Downloads/petalinux-v2020.1-final-installer.run
- Create a directory for the PetaLinux installation and then run the installer:
mkdir -p ~/petalinux/2020.1
~/Downloads/petalinux-v2020.1-final-installer.run -d ~/petalinux/2020.1
Note that I’m installing PetaLinux into the “home” directory. This is because the User Guide specifies that “PetaLinux tools need to be installed as a non-root user”.
- The first thing that the PetaLinux installer will do is ask you to read and accept
the license agreements (Xilinx End User License Agreement,
Webtalk Terms and Conditions, Third Party End User License Agreement).
For each agreement, use PgUp/PgDn to read through the agreement, then press
qto close the agreement, then pressyto accept the agreement.
Step 6: Change /bin/sh to bash
PetaLinux tools require that your host system /bin/sh be bash, which in Ubuntu it is dash.
- In the terminal, run this command:
chsh -s /bin/bash. - Reboot the VM.
- Open a terminal and run these commands to make
/bin/shlink to/bin/bash:
sudo rm /bin/sh
sudo ln -s /bin/bash /bin/sh
All done!
Now you should be able to run the PetaLinux tools in a terminal with this command:
source ~/petalinux/2020.1/settings.sh. If all is good you can go ahead and delete the installers
for Vitis and PetaLinux (that will free up about 37.8GB):
rm ~/Downloads/Xilinx_Unified_2020.1_0602_1208.tar.gz
rm -r ~/Downloads/Xilinx_Unified_2020.1_0602_1208/
rm ~/Downloads/petalinux-v2020.1-final-installer.run
This is a good time to take a “snapshot” of your VM so that you can go back to a clean setup if ever it gets corrupted down the line.