Here we go again. In this post I’m going to go through the steps of installing Vitis and PetaLinux 2024.1. Unfortunately I have to go through this process on a regular basis. Installing dev tools like this from the biggest FPGA vendor in the world should be easy but for some reason there are always problems - hence the need to keep notes.
The image that I used for this post was generated by ChatGPT.
Step 1: Download and Install Vitis
First we’re going to download Vitis 2024.1, install the dependencies and then run the installer. I’m going to download the full installer which is a lot to download (more than 100GB), but I prefer that method for two reasons: (1) if the installer fails mid-way, I don’t have to re-download and (2) I can use the same installer for other machines.
- From Ubuntu, open Firefox and download AMD Unified Installer for FPGAs & Adaptive SoCs 2024.1 SFD from the Xilinx downloads website.
- Assuming that it has been downloaded to your
~/Downloadsdirectory, we will need to extract theFPGAs_AdaptiveSoCs_Unified_2024.1_0522_2023.tar.gzfile with these commands:
tar xvzf ~/Downloads/FPGAs_AdaptiveSoCs_Unified_2024.1_0522_2023.tar.gz -C ~/Downloads/.
- Install the dependencies to avoid the installer freezing on “Generating installed device list” (more info on this problem in the forum post):
cd ~/Downloads/FPGAs_AdaptiveSoCs_Unified_2024.1_0522_2023/
./installLibs.sh
- Run the Vitis installer:
./xsetup
- During the installation, you will be told that there are newer versions available. You can refuse these upgrades unless you actually need them.
Step 2: Install PetaLinux dependencies
Next step is to install the dependencies of PetaLinux 2024.1. Just open
a terminal in Ubuntu by pressing Ctrl + Alt + T and run the following commands.
sudo apt-get install iproute2 \
gawk \
python3 \
python \
build-essential \
gcc \
git \
make \
net-tools \
libncurses5-dev \
tftpd \
zlib1g-dev \
libssl-dev \
flex \
bison \
libselinux1 \
gnupg \
wget \
git-core \
diffstat \
chrpath \
socat \
xterm \
autoconf \
libtool \
tar \
unzip \
texinfo \
zlib1g-dev \
gcc-multilib \
automake \
zlib1g:i386 \
screen \
pax \
gzip \
cpio \
python3-pip \
python3-pexpect \
xz-utils \
debianutils \
iputils-ping \
python3-git \
python3-jinja2 \
libegl1-mesa \
libsdl1.2-dev \
pylint3
Want to know where to get the PetaLinux dependencies for a different version? It can be found in the release notes for the version that you are installing. Just go to the Reference Guide, choose the version that you are using (there is a drop-down selector on the heading bar), then find the link to the release notes. At the bottom of the release notes you will find attachments, one of them being an Excel file containing a list of the dependencies. It also contains a one line command that you can run in a terminal and install all of the dependencies in one go.
Step 3: Install PetaLinux
- Open up Firefox browser and download the PetaLinux 2024.1 Installer
from the Xilinx website here. Let’s assume the installer was saved to the
~/Downloadsdirectory. - In the terminal, make the installer executable:
chmod +x ~/Downloads/petalinux-v2024.1-05202009-installer.run
- Create a directory for the PetaLinux installation and then run the installer:
mkdir -p ~/petalinux/2024.1
~/Downloads/petalinux-v2024.1-05202009-installer.run -d ~/petalinux/2024.1
Note that I’m installing PetaLinux into the “home” directory. This is because the Reference Guide specifies that “PetaLinux tools need to be installed as a non-root user”.
- The PetaLinux installer will ask you to read and accept the license agreements.
For each agreement, use PgUp/PgDn to read through the agreement, then press
qto close the agreement, then pressyto accept the agreement.
Step 4: Change /bin/sh to bash
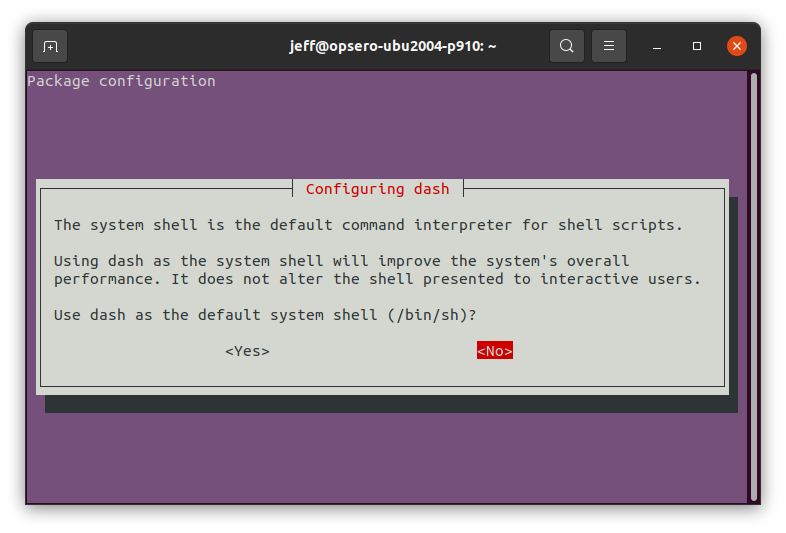
PetaLinux tools require that your host system /bin/sh be bash, which in Ubuntu it is dash.
- In the terminal, run this command:
sudo dpkg-reconfigure dash. - You will be asked if you want to use dash as the default system shell, to which you should
select “No” and press enter.

Clean up
First check that you can source PetaLinux by running source ~/petalinux/2024.1/settings.sh. You can also
check that Vitis has been installed properly by launching Vivado from the desktop icon.
If all is good and you don’t need the installers for another machine, then you can go ahead and delete them.
That will free up about 234GB, so it’s worth it:
rm ~/Downloads/FPGAs_AdaptiveSoCs_Unified_2024.1_0522_2023*
rm -r ~/Downloads/FPGAs_AdaptiveSoCs_Unified_2024.1_0522_2023/
rm ~/Downloads/petalinux-v2024.1-05202009-installer.run
