Title here
Summary here
Using Certified Ubuntu 22.04 LTS for Xilinx devices
June 15, 202315 minutes

If you want to develop smart vision applications using Raspberry Pi cameras, the Zynq UltraScale+ MPSoC and Ubuntu 22.04 LTS, we’ve just released some code and the hardware to help you get started. For the launch of our new RPi Camera FMC, we’ve ported the Kria Vitis Platforms and Overlays over to the ZCU106 armed with an RPi Camera FMC. The result is that you can now build and develop the Smartcam and NLP-Smartvision applications in Certified Ubuntu 22.04 LTS for the ZCU106 with Raspberry Pi cameras connected via the FMC connector.
In this post I’m going to show you how you can set everything up and get started on your own FPGA powered smart vision application. There are three main parts to this: (1) prepare the ZCU106 board for Ubuntu 22.04 LTS, (2) build and install the hardware platforms and overlays, and (3) build and run the applications.
You can use a Windows PC for some of these steps, however if you want to build the platforms and overlays, you will need a Linux PC for that.
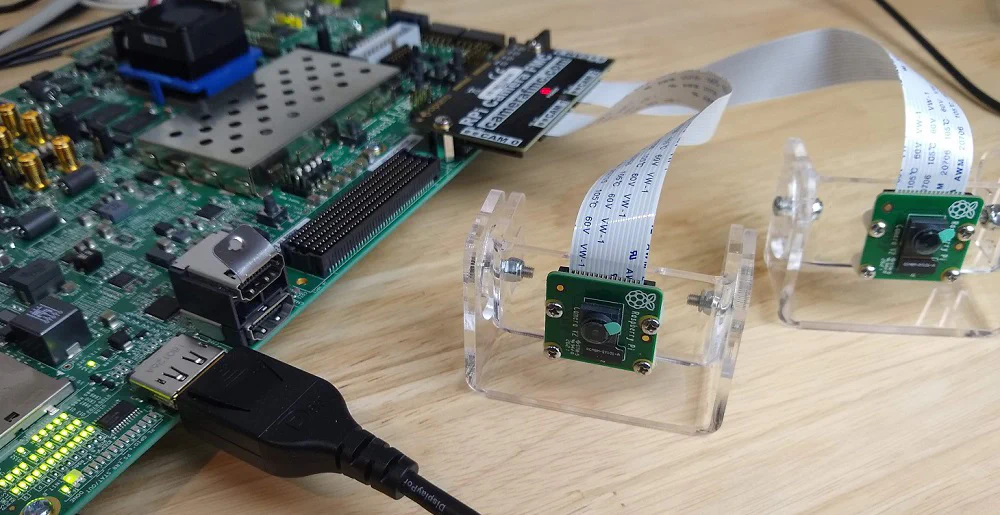
You’ll need to plug a Raspberry Pi camera v2 into the CAM1 port of the RPi Camera FMC. Optionally
you can also connect one to the port labelled CAM2. Then you will need to plug the RPi Camera FMC into the HPC0
connector of the ZCU106. Your setup should look like the image below.
We’re going to build the platforms using a PC running Ubuntu 20.04 LTS, but you can use a different version of Ubuntu, or even Red Hat or CentOS, as long as it is one of the supported OSes of PetaLinux 2022.1.
You will need to have Vitis and PetaLinux 2022.1 installed on your machine. If you need some guidance to installing Vitis and PetaLinux 2020.2, I’ve written a guide to installing the older version 2020.1 here. In that post we installed it onto a virtual machine, but for this post I highly recommend using a dedicated machine if you can because it’s quite a big project and the build time can be extremely long on a VM.
Download Ubuntu 22.04 LTS for ZCU10x then extract the image file from it. If you’re using Windows, you would use 7-Zip to extract the image file. If you’re using Ubuntu, you can just right click on the file and click “Extract Here”.
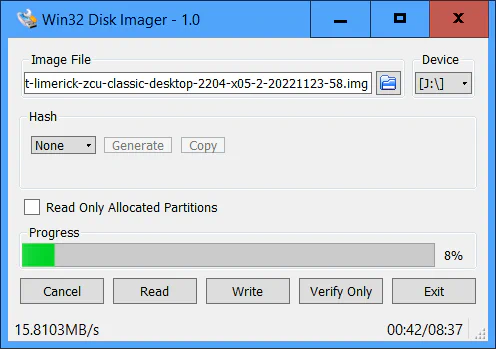
Now you need to burn that image file to your SD card. In Windows, I use Win32DiskImager. In Ubuntu, you would use Disk Image Writer. Make sure that your SD card is plugged in, and be very careful that you select the correct drive to write to.
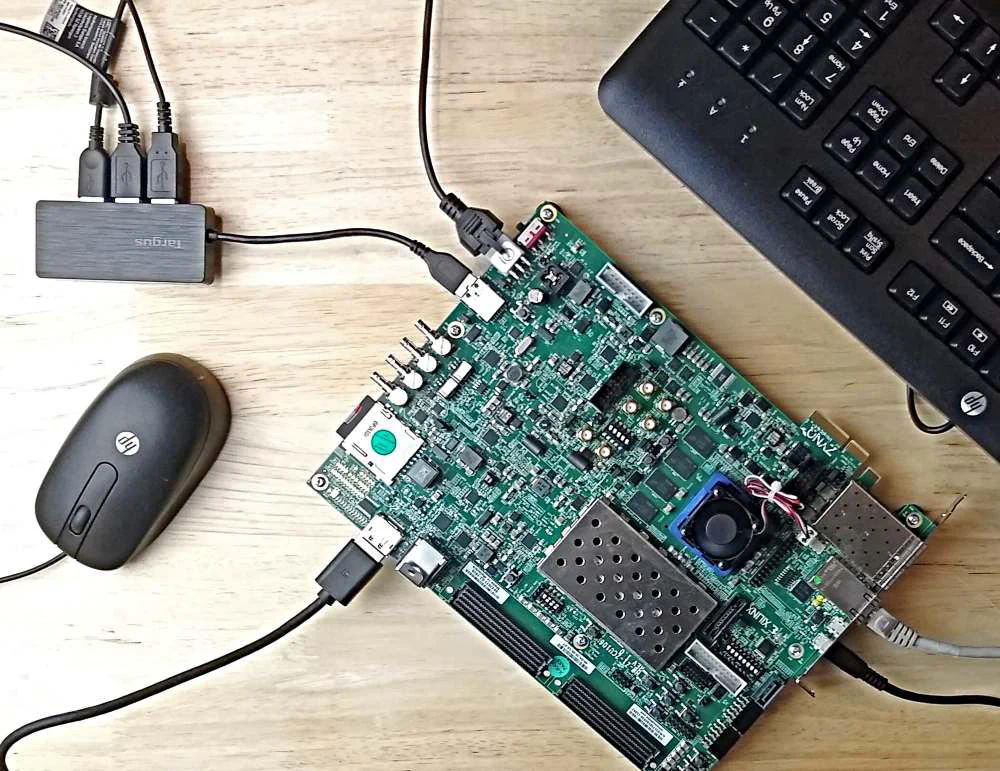
We’ll do the following steps over the USB-UART port, not the Ubuntu GUI although it is possible to do so. Plug a USB cable into the USB-UART port (labelled “UART” on the PC mounting bracket, shown in the bottom right corner of the above image) and open a serial terminal set to the correct comport and the speed of 115200bps.
With the keyboard, mouse, DisplayPort monitor and Ethernet plugged into the ZCU106, insert the SD card into the slot
and power up the board.
After a minute or so you will be able to login over the USB-UART terminal. Login to Ubuntu using these credentials:
ubuntuubuntuYour terminal screen should look like this:
[   13.074371] systemd[1]: Starting Load Kernel Module pstore_blk...
[   13.093118] systemd[1]: Starting Load Kernel Module pstore_zone...
[   13.112627] systemd[1]: Starting Load Kernel Module ramoops...
[   13.126554] systemd[1]: Condition check resulted in OpenVSwitch configuration for cleanup being skipped.
[   13.144369] systemd[1]: Starting File System Check on Root Device...
[   13.167510] systemd[1]: Starting Load Kernel Modules...
[   13.185284] systemd[1]: Starting Coldplug All udev Devices...
[   13.207943] systemd[1]: Started Journal Service.
[   13.395082] EXT4-fs (mmcblk0p2): re-mounted. Opts: discard,errors=remount-ro. Quota mode: none.

Ubuntu 22.04.1 LTS zynqmp ttyPS0

zynqmp login: ubuntu
Password:
Welcome to Ubuntu 22.04.1 LTS (GNU/Linux 5.15.0-1015-xilinx-zynqmp aarch64)

 * Documentation:  https://help.ubuntu.com
 * Management:     https://landscape.canonical.com
 * Support:        https://ubuntu.com/advantage

  System information as of Wed Jun 14 12:46:28 UTC 2023

  System load:  3.61083984375      Processes:             195
  Usage of /:   16.6% of 28.17GB   Users logged in:       0
  Memory usage: 8%                 IPv4 address for eth0: 192.168.2.58
  Swap usage:   0%

3 updates can be applied immediately.
To see these additional updates run: apt list --upgradable


The list of available updates is more than a week old.
To check for new updates run: sudo apt update


The programs included with the Ubuntu system are free software;
the exact distribution terms for each program are described in the
individual files in /usr/share/doc/*/copyright.

Ubuntu comes with ABSOLUTELY NO WARRANTY, to the extent permitted by
applicable law.

To run a command as administrator (user "root"), use "sudo <command>".
See "man sudo_root" for details.

ubuntu@zynqmp:~$192.168.2.58,
but expect yours to be different. If you missed this, you can get your
IP address by typing hostname -I.We first want to make sure that the board has access to the internet. We can do this by running ping:
ping 8.8.8.8
ubuntu@zynqmp:~$ ping 8.8.8.8
PING 8.8.8.8 (8.8.8.8) 56(84) bytes of data.
64 bytes from 8.8.8.8: icmp_seq=1 ttl=118 time=6.23 ms
64 bytes from 8.8.8.8: icmp_seq=2 ttl=118 time=5.81 ms
64 bytes from 8.8.8.8: icmp_seq=3 ttl=118 time=5.81 ms
^C
--- 8.8.8.8 ping statistics ---
3 packets transmitted, 3 received, 0% packet loss, time 2003ms
rtt min/avg/max/mdev = 5.807/5.948/6.226/0.196 ms
ubuntu@zynqmp:~$
If you can’t ping successfully with that, then you need to figure out what is wrong with your network connection and fix it, because we will need it to install the updates in the following steps.
Now we can install the xlnx-config snap:
sudo snap install xlnx-config --classic --channel=2.xThen run the xlnx-config.sysinit command:
sudo xlnx-config.sysinitThat last command will also update the system, and you should notice that the kernel gets updated in the process. We will have to reboot Ubuntu at this point.
sudo reboot nowThe Smartcam and NLP-Smartvision applications are deployed as Docker containers, so we will need to install docker to be able to build and run them on the ZCU106.
The instructions for installing docker can be found here:
Install docker using the apt repository.
Once docker is installed, we need to run the following commands so that we don’t need to use sudo everytime
we call it:
sudo groupadd docker
sudo usermod -a -G docker $USERIn this step we will build the platforms and overlays that are required by the Smartcam and NLP-Smartvision applications. This is done on our Linux PC, which is ideally a physical machine (as opposed to a virtual one) with lots of RAM because the platforms are big and take a while to build. The good news is, you only need to build the one that you intend on using.
In this post we get straight to the point and build all of the required components with a single command. In future posts I will show you how we can build specific components so that you’re in a position to modify and build on the designs.
If you prefer not to build the platforms at this time, you can download pre-built versions of them from the links below:
You don’t have to download them right now, just skip to the next step (Install the Platform Asset Container) and use the wget
commands.
These steps are performed on the Linux PC:
--recursive option.git clone --recursive https://github.com/fpgadeveloper/camera-fmc-vitis-platforms.gitsource <path-to-xilinx-tools>/Vivado/2022.1/settings64.sh
source <path-to-petalinux-tools>/2022.1/settings.shcd camera-fmc-vitis-platforms/zcu106
make pac OVERLAY=smartcamcd camera-fmc-vitis-platforms/zcu106
make pac OVERLAY=nlp-smartvision
4. Transfer the Platform Asset Container (PAC) to the ZCU106. Note that in the following commands,
   I am using the IP address that I obtained earlier using `hostname -I`. You should replace the IP
   address with the one you obtain for your board.
   * For the Smartcam app:
   ```bash
   cd pac
scp smartcam_pac.zip [email protected]:~/.cd pac
scp nlp-smartvision_pac.zip [email protected]:~/.This step is performed through the USB-UART command terminal of the ZCU106 board.
If you did not perform the last step and instead want to install the pre-built PACs, you will first need to download them to your ZCU106 board by using the following commands:
cd ~
wget https://download.opsero.com/zcu10x-ubuntu-22-04/smartcam_pac.zip
wget https://download.opsero.com/zcu10x-ubuntu-22-04/nlp-smartvision_pac.zip
The final output product of the build we just ran is a compressed
Platform Asset Container
(PAC). The PAC contains all of the boot
collateral that is required by the xlnx-config snap to load a custom bitstream into the FPGA with a corresponding
device tree and DPU acceleration kernel. To install the PAC, we just need to extract the files to the folder where the
xlnx-config snap is expecting to find PACs. It could be in /usr/local/share/xlnx-config/ or /boot/firmware/xlnx-config/.
We’ll use the first path, which should not be there at first - so we have to create it:
cd ~
sudo mkdir -p /usr/local/share/xlnx-config
sudo unzip smartcam_pac.zip -d /usr/local/share/xlnx-config/
sudo unzip nlp-smartvision_pac.zip -d /usr/local/share/xlnx-config/
The terminal should look like this:
ubuntu@zynqmp:~$ sudo mkdir -p /usr/local/share/xlnx-config
ubuntu@zynqmp:~$ sudo unzip smartcam_pac.zip -d /usr/local/share/xlnx-config/
Archive:  smartcam_pac.zip
   creating: /usr/local/share/xlnx-config/smartcam_pac/
   creating: /usr/local/share/xlnx-config/smartcam_pac/hwconfig/
   creating: /usr/local/share/xlnx-config/smartcam_pac/hwconfig/cfg/
  inflating: /usr/local/share/xlnx-config/smartcam_pac/hwconfig/cfg/manifest.yaml
   creating: /usr/local/share/xlnx-config/smartcam_pac/hwconfig/cfg/zcu106/
  inflating: /usr/local/share/xlnx-config/smartcam_pac/hwconfig/cfg/zcu106/bootgen.bif
  inflating: /usr/local/share/xlnx-config/smartcam_pac/hwconfig/cfg/zcu106/pmufw.elf
  inflating: /usr/local/share/xlnx-config/smartcam_pac/hwconfig/cfg/zcu106/bl31.elf
  inflating: /usr/local/share/xlnx-config/smartcam_pac/hwconfig/cfg/zcu106/system.bit
  inflating: /usr/local/share/xlnx-config/smartcam_pac/hwconfig/cfg/zcu106/dpu.xclbin
  inflating: /usr/local/share/xlnx-config/smartcam_pac/hwconfig/cfg/zcu106/zynqmp_fsbl.elf
  inflating: /usr/local/share/xlnx-config/smartcam_pac/hwconfig/cfg/zcu106/system.dtb
ubuntu@zynqmp:~$ sudo unzip nlp-smartvision_pac.zip -d /usr/local/share/xlnx-config/
Archive:  nlp-smartvision_pac.zip
   creating: /usr/local/share/xlnx-config/nlp-smartvision_pac/
   creating: /usr/local/share/xlnx-config/nlp-smartvision_pac/hwconfig/
   creating: /usr/local/share/xlnx-config/nlp-smartvision_pac/hwconfig/cfg/
  inflating: /usr/local/share/xlnx-config/nlp-smartvision_pac/hwconfig/cfg/manifest.yaml
   creating: /usr/local/share/xlnx-config/nlp-smartvision_pac/hwconfig/cfg/zcu106/
  inflating: /usr/local/share/xlnx-config/nlp-smartvision_pac/hwconfig/cfg/zcu106/bootgen.bif
  inflating: /usr/local/share/xlnx-config/nlp-smartvision_pac/hwconfig/cfg/zcu106/pmufw.elf
  inflating: /usr/local/share/xlnx-config/nlp-smartvision_pac/hwconfig/cfg/zcu106/bl31.elf
  inflating: /usr/local/share/xlnx-config/nlp-smartvision_pac/hwconfig/cfg/zcu106/system.bit
  inflating: /usr/local/share/xlnx-config/nlp-smartvision_pac/hwconfig/cfg/zcu106/dpu.xclbin
  inflating: /usr/local/share/xlnx-config/nlp-smartvision_pac/hwconfig/cfg/zcu106/zynqmp_fsbl.elf
  inflating: /usr/local/share/xlnx-config/nlp-smartvision_pac/hwconfig/cfg/zcu106/system.dtb
ubuntu@zynqmp:~$
Now we can check if xlnx-config can actually find the PACs.
ubuntu@zynqmp:~$ xlnx-config -q


PAC configurations present in the system:

| PAC Cfg                       |Act| zcu106 Assets Directory
---------------------------------------------------------------------------------------------------------------
| smartcam_platform             |   | /usr/local/share/xlnx-config/smartcam_pac/hwconfig/cfg/zcu106
| nlp-smartvision_platform      |   | /usr/local/share/xlnx-config/nlp-smartvision_pac/hwconfig/cfg/zcu106
---------------------------------------------------------------------------------------------------------------

* No configuration is currently activated *

ubuntu@zynqmp:~$
As you can see, it found both PACs and neither of them is active (yet). Let’s activate the NLP-Smartvision PAC just to see what it does:
ubuntu@zynqmp:~$ sudo xlnx-config -a nlp-smartvision_platform
Activating assets for nlp-smartvision_platform on the zcu106
* Copied dpu.xclbin to xlnx-config assets folder /var/snap/xlnx-config/28/assets/dpu.xclbin
* Updating /usr/lib/dpu.xclbin with dpu.xclbin from platform assets
* Generating boot binary /boot/firmware/boot1060.bin...
* Updating Multi-boot register
* Updating /var/lib/xlnx-config/active_board with zcu106

* IMPORTANT: Please reboot the system for the changes to take effect.


ubuntu@zynqmp:~$
Now as indicated, we need to reboot the system. When the system reboots, xlnx-config will program the FPGA with
the bitstream of the active PAC, and we’ll then be able to use it.
sudo reboot nowIn this final step we will build the docker container for the application that we want to use (Smartcam or NLP-Smartvision). We can choose to build the docker container on our Linux PC or on the ZCU106. If you build it on the Linux PC, you will have the extra step of transferring the docker containers over to the ZCU106 - so here we’ll just build them on the ZCU106 and save ourselves the hassle.
cd ~
git clone --branch xlnx_rel_v2022.1 https://github.com/fpgadeveloper/zcu10x-docker.git
cd zcu10x-docker/dockerfiles
docker build -f smartcam . -t smartcam
docker build -f nlp-smartvision . -t nlp-smartvision
The build process for Smartcam takes about 2 minutes while the one for NLP-Smartvision takes about 4 minutes. When the applications are built,
we can run docker images to see that the containers are there.
ubuntu@zynqmp:~/zcu10x-docker/dockerfiles$ docker images
REPOSITORY        TAG       IMAGE ID       CREATED              SIZE
nlp-smartvision   latest    bba6635f65ab   About a minute ago   1.41GB
smartcam          latest    b3c7d5a07b18   5 minutes ago        1.41GB
hello-world       latest    b038788ddb22   5 weeks ago          9.14kB
ubuntu@zynqmp:~/zcu10x-docker/dockerfiles$Before being able to run the Smartcam application, we need to load the corresponding PAC using xlnx-config and
then reboot. The first command below will deactivate any currently active PAC, then the second command will activate the
smartcam PAC. Note that once you activate a PAC, it remains active on future boot sequences, so you only have to do
this part once:
sudo xlnx-config -d
sudo xlnx-config -a smartcam_platform
sudo reboot now
To run an application, we need to load the corresponding docker container. Then once inside the docker, we can run the application commands. Some commands require us to disable the Ubuntu GUI, while others don’t. For this post, we’re going to run some commands that require us to disable the Ubuntu GUI, so start by doing that:
sudo xmutil desktop_disableThen load the docker container:
docker run \
--env="DISPLAY" \
-h "xlnx-docker" \
--env="XDG_SESSION_TYPE" \
--net=host \
--privileged \
--volume="$HOME/.Xauthority:/root/.Xauthority:rw" \
-v /tmp:/tmp \
-v /dev:/dev \
-v /sys:/sys \
-v /usr/lib/dpu.xclbin:/usr/lib/dpu.xclbin \
-v /lib/firmware/xilinx:/lib/firmware/xilinx \
-v /run:/run \
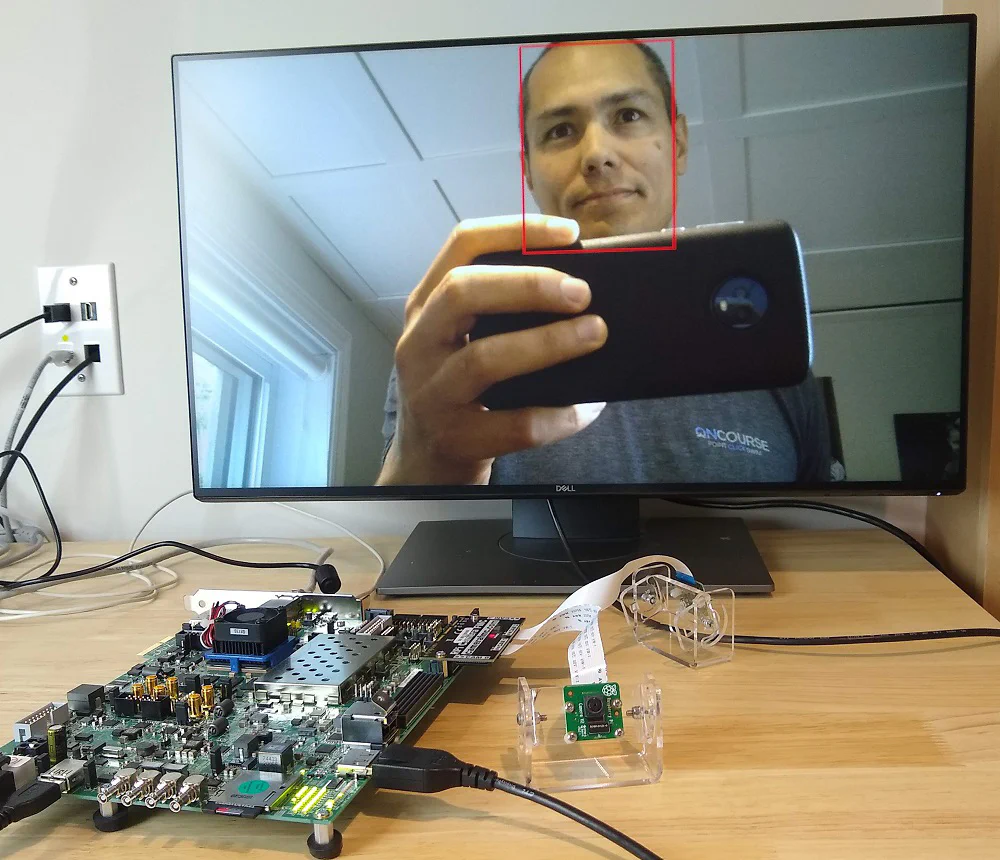
-it smartcam:latest bashWhen inside the docker, we can run the smartcam application. The following command specifies using the MIPI camera - which is the RPi camera that is connected to the CAM1 port of the RPi Camera FMC. It also specifies the resolution and that we would like the output to be shown on the DisplayPort monitor.
smartcam --mipi -W 1920 -H 1080 --target dpTo see all of the smartcam options, you can type smartcam --help or take a look
here.
The photo below shows the smartcam app in action.
As we did with the Smartcam application, we first need to activate the NLP-Smartvision PAC using xlnx-config before we
can use it. Assuming another PAC is already active, we first need to disable it:
sudo xlnx-config -d
sudo xlnx-config -a nlp-smartvision_platform
sudo reboot now
In this demo of the NLP-Smartvision application, we’re again going to disable the Ubuntu GUI (unless it’s already disabled):
sudo xmutil desktop_disableThen load the docker container:
docker run \
--env="DISPLAY" \
-h "xlnx-docker" \
--env="XDG_SESSION_TYPE" \
--net=host \
--privileged \
-v /tmp:/tmp \
-v /dev:/dev \
-v /sys:/sys \
-v /usr/lib/dpu.xclbin:/usr/lib/dpu.xclbin \
-v /lib/firmware/xilinx:/lib/firmware/xilinx \
-v /run:/run \
-it nlp-smartvision:latest bash
Now we can call the application and again specify that we want to use the camera on port CAM1 of the RPi Camera FMC:
nlp-smartvision -m cam1To use CAM2, we could replace cam1 with cam2 in the above command. To see all of the nlp-smartvision options, just
type nlp-smartvision --help.
The NLP-Smartvision demo uses natural language processing to allow you to give it voice commands to switch into different modes of operation. The table below lists the different voice commands and their function.
| Keyword | Function |
|---|---|
| YES | Show bounding box |
| NO | Don’t show bounding box |
| LEFT | Bounding boxes on left side only |
| RIGHT | Bounding boxes on right side only |
| OFF | Display OFF |
| ON | Display ON |
| GO | Change bounding box color (B->G->R) |
| STOP | Reset display settings to default |
| UP | Switch to next task |
| DOWN | Switch to previous task |
There are three AI tasks:
By using the keywords UP and DOWN,
we can switch between these different tasks. In the photo below, I’m using it in object detection mode and we can see
that the bounding box is labelled “car”.

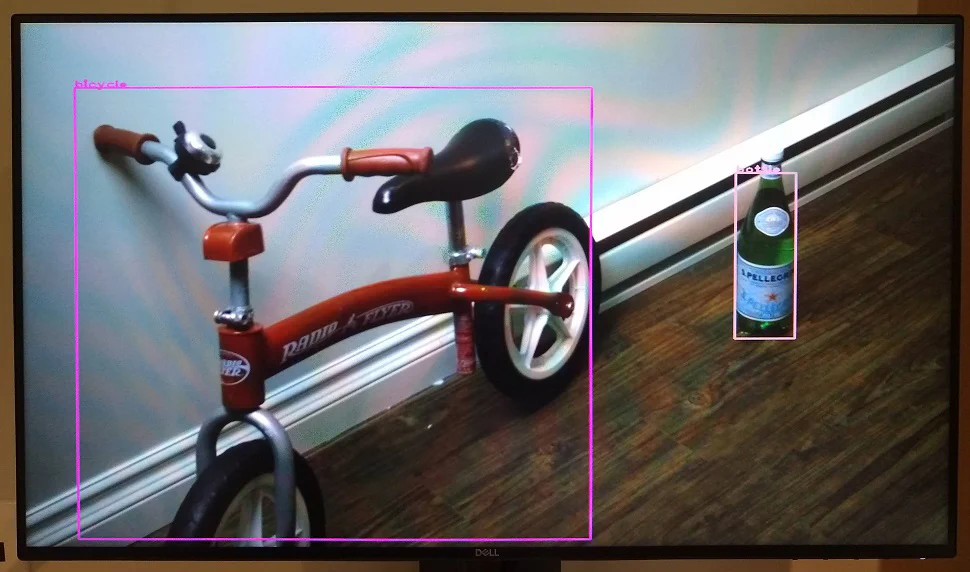
I also threw a couple other things in front of the camera to see how well it worked. The image below shows bounding boxes labelled “bicycle” and “bottle”.
I’ve only shown you a snippet of what you can do with these applications. Here are some of the other things that you can do with them:
To read more about these use cases, just checkout the AMD Xilinx documentation on the Smartcam and NLP-Smartvision apps.
You will find that when you boot with an active PAC that contains a device tree that contains ZOCL (node zyxclmm_drm), which in this project’s case we do, you lose the Ubuntu GUI login screen after the boot sequence. This doesn’t prevent you from logging into the UART command terminal, and running the examples that I showed above, but it’s still not a nice situation. It took me hours to figure out the cause of this problem, so I hope that I’m saving you headaches by writing the solution here.
You need to edit the /etc/X11/xorg.conf.d/xilinx-zynqmp.conf file:
sudo nano /etc/X11/xorg.conf.d/xilinx-zynqmp.confThen in the editor, find the device section (shown below) and add the last line with the BusID as shown below:
Section "Device"
        Identifier      "ZynqMP"
        Driver          "armsoc"
        Option          "DRI2"                  "true"
        Option          "DRI2_PAGE_FLIP"        "false"
        Option          "DRI2_WAIT_VSYNC"       "true"
        Option          "DEBUG"                 "false"
        Option          "BusID"                 "fd4a0000.display"
EndSection
This modification will ensure that the ARMSoC driver selects the DisplayPort monitor as the default monitor. Without this line, the ARMSoC driver ends up selecting ZOCL as the active monitor which inevitably fails. If you want to see where this happens in the ARMSoC driver, it’s in this code:
https://github.com/endlessm/xf86-video-armsoc/blob/master/src/armsoc_driver.c
The ARMSOCProbe function expects the BusID to be an option in the device in file /etc/X11/xorg.conf.d/xilinx-zynqmp.conf.
Strangely, that doesn’t fit with how the file is described
here.
But let’s not go down that rabbit hole.
As of yesterday the RPi Camera FMC is available for purchase from the Opsero RPi Camera FMC product page and in the next day or two it should also be in stock at Digi-Key.