Title here
Summary here
Using Raspberry Pi cameras
July 5, 202310 minutes

In the last post we looked at how to run the Smartcam and NLP-SmartVision apps on the ZCU106 and Certified Ubuntu 22.04 LTS. One reader mentioned that running these apps in a Docker container on Ubuntu probably comes with a performance penalty when compared to running it on a lean PetaLinux build. This piqued my curiosity so in this post, we’re going to get the NLP-Smartvision app running in PetaLinux on the ZCU104 and then in the next post we’ll measure whatever penalty there may be to the throughput (in frames per second) and/or the glass-to-glass latency (in milliseconds).
The
Github repo that we use to build this design also contains the designs for the ZCU102 and ZCU106 boards. To build for these
boards, you can follow the same instructions - just replace the zcu104 references with the board that you want to use.
You can use a Windows PC for some of these steps, however if you want to build the platform, overlay and PetaLinux you will need a Linux PC for that. If you don’t have a Linux PC, you can skip the build process and use the pre-built files.
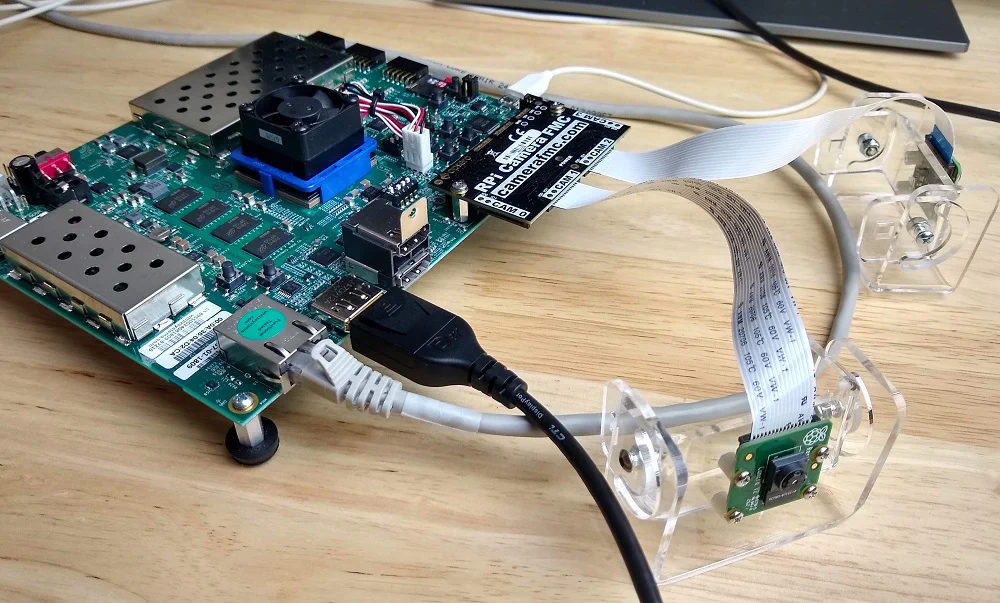
You’ll need to plug a Raspberry Pi camera v2 into the CAM1 port of the RPi Camera FMC. Optionally
you can also connect one to the port labelled CAM2. Then you will need to plug the RPi Camera FMC into the LPC
connector of the ZCU104. Your setup should look like the image below.
We’re going to build the platform using a PC running Ubuntu 20.04 LTS, but you can use a different version of Ubuntu, or even Red Hat or CentOS, as long as it is one of the supported OSes of PetaLinux 2022.1.
You will need to have Vitis and PetaLinux 2022.1 installed on your machine. If you need some guidance to installing Vitis and PetaLinux, I’ve written a guide to installing the older version 2020.1 here. In that post we installed it onto a virtual machine, but for this post I highly recommend using a dedicated machine if you can because it’s quite a big project and the build time can be extremely long on a VM.
In this step we will build the platform, overlay and PetaLinux project to run the NLP-Smartvision application. This is done on our Linux PC, which is ideally a physical machine (as opposed to a virtual one) with lots of RAM because the design is big and takes a while to build.
If you prefer to skip the build process and instead use the pre-built boot files, you can download them from the links below and then skip to the next step ( Prepare the SD card for PetaLinux):
These steps are performed on the Linux PC:
--recursive option.git clone --recursive https://github.com/fpgadeveloper/camera-fmc-vitis-platforms.git
2. Source the Vitis and PetaLinux 2022.1 setup scripts:
   ```bash
   source <path-to-xilinx-tools>/Vivado/2022.1/settings64.sh
source <path-to-petalinux-tools>/2022.1/settings.shcd camera-fmc-vitis-platforms/zcu104
make petalinux OVERLAY=nlp-smartvisionThe build process takes a long time. On my best PC it takes about 2-3 hours in total. While you wait, you can start preparing the SD card as described below.
The PetaLinux project that we just built is configured to boot from the SD card, and to store the root filesystem on the SD card. So we need to create two partitions on the SD card: one for the boot files and another for the root file system. We then need to copy the boot files and root file system to the corresponding partitions.
dmesg command. The SD card should be found at the
end of the log, and it’s device name should be something like /dev/sdX, where X is a letter such as a,b,c,d, etc. Note that
you should replace the X in the following instructions.fdisk by typing the command (replace sdX with the correct device name):sudo fdisk /dev/sdX
3. Make the `boot` partition: type `n` to create a new partition, then type `p` to make it primary, then use the default
partition number and first sector. For the last sector, type `+1G` to allocate 1GB to this partition.

4. Make the `boot` partition bootable by typing `a`

5. Make the `root` partition: typing `n` to create a new partition, then type `p` to make it primary, then use the default
partition number, first sector and last sector.

6. Save the partition table by typing `w`

7. Format the `boot` partition (FAT32) by typing:
   ```bash
sudo mkfs.vfat -F 32 -n boot /dev/sdX1root partition (ext4) by typing:sudo mkfs.ext4 -L root /dev/sdX2
9. This step can only be done once the build has completed. Copy the boot files to the `boot` partition of the SD
   card: Assuming the boot partition was mounted to `/media/user/boot`, follow these instructions:
   ```bash
   cd /media/user/boot/
   sudo cp <git-repo-path>/zcu104/petalinux/zcu104_rpiMipiRx_DP/images/linux/BOOT.BIN .
   sudo cp <git-repo-path>/zcu104/petalinux/zcu104_rpiMipiRx_DP/images/linux/boot.scr .
   sudo cp <git-repo-path>/zcu104/petalinux/zcu104_rpiMipiRx_DP/images/linux/image.ub .
   sudo cp <git-repo-path>/zcu104/overlays/examples/nlp-smartvision/binary_container_1/dpu.xclbin .
If you’re using the pre-built boot files, the relevant files are in the boot folder; just copy them over.
rootfs.tar.gz file to the root partition. Assuming the root partition was
mounted to /media/user/root, follow these instructions:cd /media/user/root/
sudo cp <git-repo-path>/zcu104/petalinux/zcu104_rpiMipiRx_DP/images/linux/rootfs.tar.gz .
sudo tar xvf rootfs.tar.gz -C .
syncrootfs.tar.gz file is in the root folder, so just copy it over
and extract it.Once the sync command returns, you will be able to eject the SD card from the machine and plug it into the ZCU104.
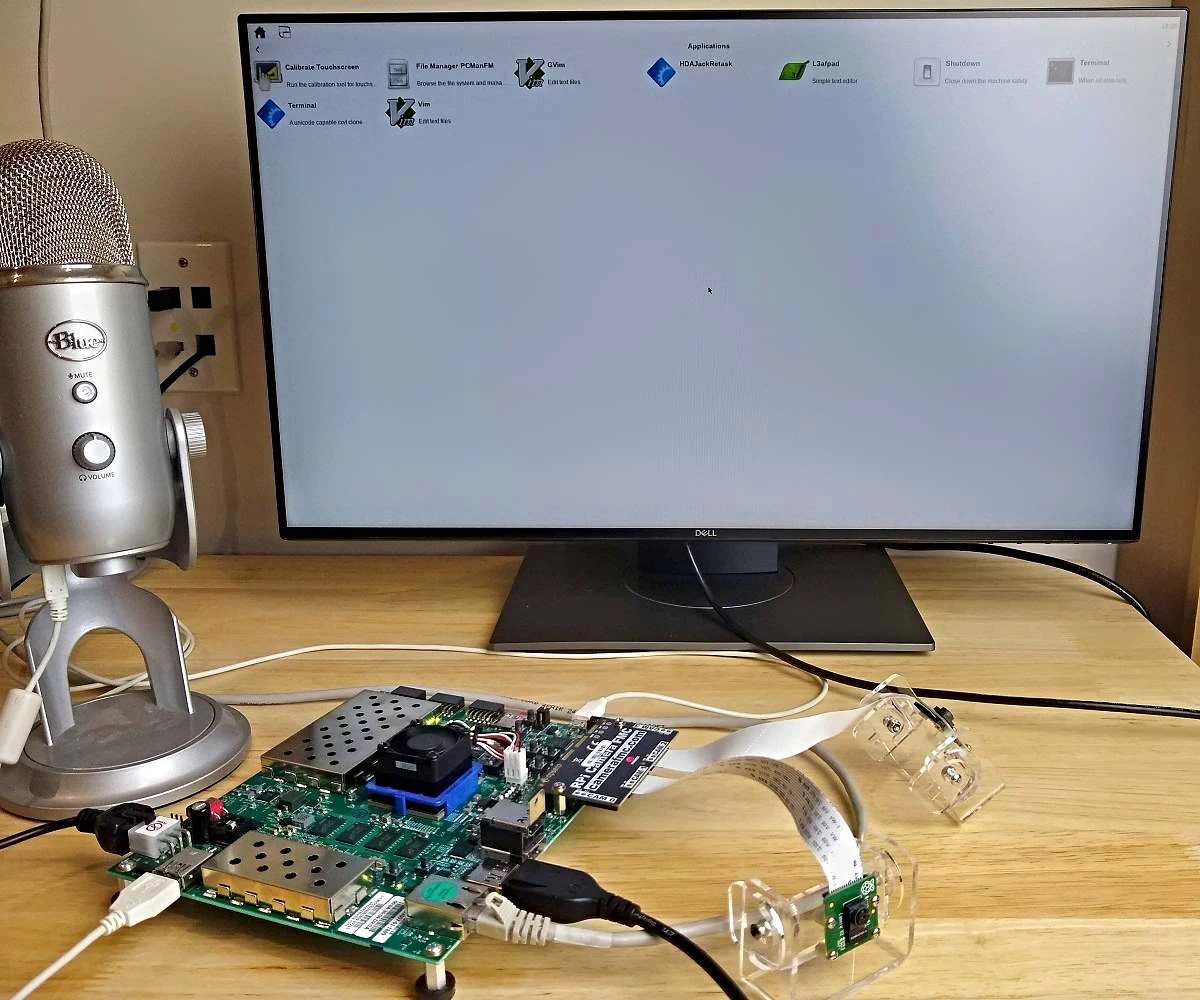
Once the SD card is loaded with the PetaLinux image that we just built, we can plug it into the ZCU104 and power up the board. On the USB-UART terminal of your PC, you should see the output of the PetaLinux boot sequence. After some time, you should also see the simple desktop environment/GUI appearing on the DisplayPort monitor.
We’ll use the USB-UART terminal for the following steps.
The login should appear on the USB-UART terminal as shown below:
PetaLinux 2022.1_release_S04190222 zcu104rpiMipiRxDP20221 ttyPS0

zcu104rpiMipiRxDP20221 login:
Enter the user name petalinux and you will immediately be asked to set the password. You will do this only once, on the
first time that PetaLinux is booted.
Let’s start by making sure that our two cameras have been found and enumerated correctly by PetaLinux. When you run the command
v4l2-ctl --list-devices, it should output the following:
zcu104rpiMipiRxDP20221:~$ v4l2-ctl --list-devices
vcap_rpi_cam1_pipe_v_proc_ss_0  (platform:vcap_rpi_cam1_pipe_v_p):
        /dev/video0

vcap_rpi_cam2_pipe_v_proc_ss_0  (platform:vcap_rpi_cam2_pipe_v_p):
        /dev/video1

Xilinx Video Composite Device (platform:xilinx-video):
        /dev/media0
        /dev/media1
The Raspberry Pi camera connected to the CAM1 port should be associated with /dev/video0 and /dev/media0,
while the one on CAM2 should be associated with /dev/video1 and /dev/media1.
Now let’s disable the desktop environment so that GStreamer can take over the monitor. After running this command, the GUI screen should disappear.
sudo systemctl isolate multi-user.targetNow run GStreamer targetting the camera on the CAM1 port of the RPi Camera FMC. After you run the following command,
you should see the video stream from the first Raspberry Pi camera appearing on the monitor. To quit, just press Ctrl-C.
gst-launch-1.0 mediasrcbin media-device=/dev/media0 v4l2src0::io-mode=mmap ! "video/x-raw, width=1920, height=1080, format=NV12, framerate=30/1" ! kmssink plane-id=39 fullscreen-overlay=true -vNow let’s target the camera on the CAM2 port of the RPi Camera FMC. Now you should see the video stream
from the second Raspberry Pi camera on the monitor. Quit by pressing Ctrl-C.
gst-launch-1.0 mediasrcbin media-device=/dev/media1 v4l2src0::io-mode=mmap ! "video/x-raw, width=1920, height=1080, format=NV12, framerate=30/1" ! kmssink plane-id=39 fullscreen-overlay=true -vIf you want to return to the desktop environment, you can use this command:
sudo systemctl isolate graphical.targetNow we are going to clone the NLP-SmartVision source code and build it in PetaLinux. Then we’ll install the build products and run the application:
git clone https://github.com/fpgadeveloper/nlp-smartvision -b xlnx_rel_v2022.1cd nlp-smartvision
mkdir -p build/install && cd build && cmake ../ && make && make DESTDIR=./install install3. Install the app:
```bash
sudo cp -r install/* /
export PATH="/opt/xilinx/kv260-nlp-smartvision/bin:$PATH"sudo systemctl isolate multi-user.target
sudo mount /dev/mmcblk0p1 /run/media/mmcblk0p1
nlp-smartvision -m cam1The terminal output should be as follows:
zcu104rpiMipiRxDP20221:~$ nlp-smartvision -m cam1                               found mipi video node at: /dev/video0
Configuring RPi cam1 node for RGB/1024x768 pipeline
[ WARN:0] global /usr/src/debug/opencv/4.5.2-r0/git/modules/videoio/src/cap_gstreamer.cpp (1081) open OpenCV | GStreamer warning: Cannot query video position: status=0, value=-1, duration=-1
Facedetect Kernel Loaded
Running remotly or Desktop environment not detected, Application will use kmssink to display video over monitor
Noise Threshold is set. You can start speaking the keywords now..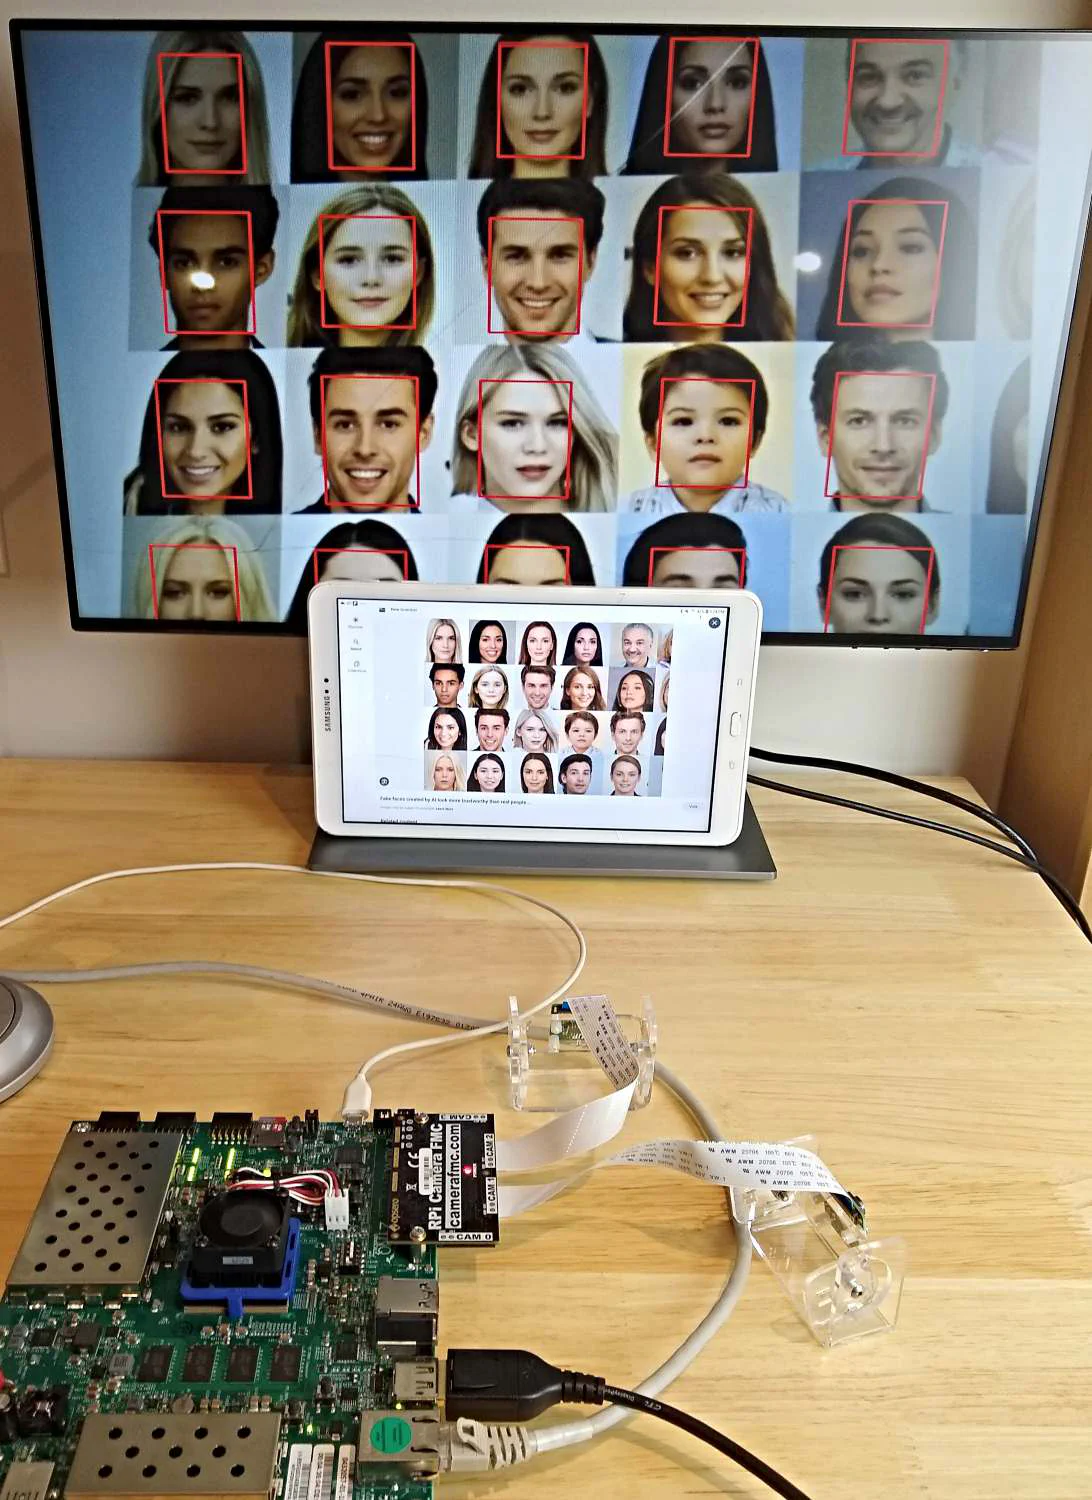
When the app is running, you should see a video stream from the Raspberry Pi camera appearing on the monitor - however
this time all faces in the video will be bounded by red boxes. The app starts in face detect mode and it
listens for voice commands to switch into other modes. By using the keywords UP and DOWN, we can switch between the
different modes: face detect, object detect, plate detect
The table below lists the different voice commands and their function.
| Keyword | Function |
|---|---|
| YES | Show bounding box |
| NO | Don’t show bounding box |
| LEFT | Bounding boxes on left side only |
| RIGHT | Bounding boxes on right side only |
| OFF | Display OFF |
| ON | Display ON |
| GO | Change bounding box color (B->G->R) |
| STOP | Reset display settings to default |
| UP | Switch to next task |
| DOWN | Switch to previous task |
If you ever see the following error messages, you need to remount the SD card’s boot partition and here’s why.
The dpu.xclbin file for this project is kept on the boot partition of the SD card. That partition is normally mounted to
/run/media/mmcblk0p1, but for reasons that I have yet to understand, the partition is intermittently unmounted. This
leaves the application without access to dpu.xclbin causing the following error message:
zcu104rpiMipiRxDP20221:~$ nlp-smartvision -m cam1
found mipi video node at: /dev/video0
Configuring RPi cam1 node for RGB/1024x768 pipeline
[ WARN:0] global /usr/src/debug/opencv/4.5.2-r0/git/modules/videoio/src/cap_gstreamer.cpp (1081) open OpenCV | GStreamer warning: Cannot query video position: status=0, value=-1, duration=-1
WARNING: Logging before InitGoogleLogging() is written to STDERR
F0704 18:40:06.688467  1072 xrt_bin_stream.cpp:60] Check failed: fd_ > 0 (-1 vs. 0) , open(/run/media/mmcblk0p1/dpu.xclbin) failed.
*** Check failure stack trace: ***

Aborted by signal Aborted...
/opt/xilinx/kv260-nlp-smartvision/bin/nlp-smartvision: line 19:  1065 Segmentation fault      /opt/xilinx/kv260-nlp-smartvision/bin/nlp-smartvision.app "$@"
Another way to test for this problem is to run show_dpu:
zcu104rpiMipiRxDP20221:~$ show_dpu
WARNING: Logging before InitGoogleLogging() is written to STDERR
F0704 18:41:21.971575  1111 xrt_bin_stream.cpp:60] Check failed: fd_ > 0 (-1 vs. 0) , open(/run/media/mmcblk0p1/dpu.xclbin) failed.
*** Check failure stack trace: ***
Aborted
This can be fixed by remounting the boot partition using this command:
sudo mount /dev/mmcblk0p1 /run/media/mmcblk0p1At this point you should be able to run show_dpu and nlp-smartvision without any problem.
In the next post, we’re going to do some benchmarking to determine if there is a performance penalty when we run NLP-SmartVision through a Docker container on Ubuntu, vs running it natively on PetaLinux. While we’re at it, I’ll show you the difference in performance between using a Raspberry Pi camera (MIPI) and a USB camera.