Title here
Summary here
With the objective of customizing it
May 19, 202313 minutes

This post is a continuation of the previous post where we setup our ZCU106 board for Ubuntu 20.04 LTS. In this post we’re going to build the hardware platform that is built into the Certified Ubuntu 20.04 LTS images for the ZCU106 board. The reason that we would want to be able to do this is so that we can customize the hardware platform - perhaps add functionality, add external connections, or add accelerator IP. In this post we wont actually modify the design, we’ll just build it and then verify that it works on the hardware. In a later post we will actually modify the platforms. My objective at that time will be to add support for the RPi Camera FMC.
Although you don’t need to have done the previous post in order to build the hardware platform here, you will need to have done it if you want to test the hardware.
The hardware platform for ZCU106 that is built into the Ubuntu 20.04 LTS release is the VCU HDMI ROI Targeted Reference Design (TRD) for ZCU106. Follow that link for a detailed description of the hardware platform, including how it works, how to build it and how to use it. It might be interesting for some people to know that there is a similar TRD for the ZCU104 board that is built into Ubuntu 20.04 LTS for that board, and it is possible to follow these instructions to build that design too.
Here’s what you will need in terms of hardware:
We’re going to build this platform using a PC running Ubuntu 18.04 LTS, but you can use a different version of Ubuntu, or even Red Hat or CentOS, as long as it is one of the supported OSes of PetaLinux 2020.2. Here is the main software that you will need to have installed on your Linux machine:
If you need some guidance to installing Vitis and PetaLinux 2020.2, I’ve written a guide to installing the older version 2020.1 here. In that post we installed it onto a virtual machine, but for this post I highly recommend using a dedicated machine if you can because it’s quite a big project and the build time can be extremely long on a VM.
You will run into build issues if you don’t install the
Y2K22 bug patch. Follow that link, download the
y2k22_patch-1.2.zip file from the attachments at the bottom of the page, extract it to the location where the
Xilinx tools were installed (in my case ~/Xilinx/) and then run it:
cd ~/Xilinx
unzip ~/Downloads/y2k22_patch-1.2.zip -d .
export LD_LIBRARY_PATH=$PWD/Vivado/2020.2/tps/lnx64/python-3.8.3/lib/
Vivado/2020.2/tps/lnx64/python-3.8.3/bin/python3 y2k22_patch/patch.py
That assumes that your Xilinx tools were installed in the ~/Xilinx directory and that the patch file was
downloaded to the ~/Downloads/ directory.
Download the XRT 2020.2 rpm/deb file that is appropriate for your OS, using the following links:
Then you need to install it by running the installer. In Ubuntu this is done with the following command
(assuming the file has gone into the ~/Downloads/ directory):
sudo apt install ~/Downloads/xrt_<version>-xrt.debFor other OSes, please refer to the
XRT installation guide.
It should install to /opt/xilinx/xrt.
To build these designs we need to get a license for the HDMI Transmitter and Receiver Subsystem IPs. We can generate a single evaluation license that covers both of those IP by using the following link: LogiCORE, HDMI, Evaluation License.
Create a node locked license and copy the license file to the ~/.Xilinx directory.
Let me just make clear some assumptions so that you can adjust my commands to suit your own situation.
~/Downloads/.| Software | Install location |
|---|---|
| Vitis 2020.2 | ~/Xilinx/ |
| PetaLinux 2020.2 | ~/petalinux/2020.2/ |
| XRT 2020.2 | /opt/xilinx/xrt/ |
Now let’s get to actually building the hardware platform.
zcu106 references
to zcu104. You will also want to pay attention to any of these notes along the way.Create a directory for working in and an environment variable to hold the path of our working directory. Change the
actual path to one that you would prefer, I’m using ~/zcu106_vcu_hdmi_roi.
cd ~
mkdir zcu106_vcu_hdmi_roi
export WORK=~/zcu106_vcu_hdmi_roi
Download the source code package from the following link:
Extract the file contents to $WORK:
unzip ~/Downloads/rdf0617-zcu106_vcu_hdmi_roi_2020_2.zip -d $WORK/.
cd $WORK/rdf0617-zcu106_vcu_hdmi_roi_2020_2rdf0428-zcu104-vcu-hdmi-roi-2020-2source ~/Xilinx/Vivado/2020.2/settings64.shexport TRD_HOME=$WORK/rdf0617-zcu106_vcu_hdmi_roi_2020_2export TRD_HOME=$WORK/rdf0428-zcu104-vcu-hdmi-roi-2020-2cd $TRD_HOME/pl
vivado -source ./designs/zcu106_ROI_HDMI/project.tclThe main output product of the Vivado build is the .xsa file which will be needed by the PetaLinux tools and Vitis
in the following steps.
source ~/petalinux/2020.2/settings.shcd $TRD_HOME/apu/vcu_petalinux_bsp/
petalinux-create -t project -s xilinx-vcu-roi-zcu106-v2020.2-final.bspcd xilinx-vcu-roi-zcu106-v2020.2-final/
petalinux-config --silentconfig --get-hw-description=$TRD_HOME/pl/build/zcu106_ROI_HDMI/zcu106_ROI_HDMI.xsa/
petalinux-buildlinux.bif:cd $TRD_HOME/apu/vcu_petalinux_bsp/xilinx-vcu-roi-zcu106-v2020.2-final/images/linux
gedit linux.biflinux.bif file, then save the file./* linux */
the_ROM_image:
{
[bootloader, destination_cpu = a53-0] <zynqmp_fsbl.elf>
[pmufw_image] <pmufw.elf>
[destination_device=pl] <bitstream>
[destination_cpu=a53-0, exception_level=el-3, trustzone] <bl31.elf>
[destination_cpu=a53-0, exception_level=el-2] <u-boot.elf>
}boot and image and copy some of the build products
into those directories:mkdir boot
mkdir image
cp linux.bif boot/.
cp bl31.elf pmufw.elf u-boot.elf zynqmp_fsbl.elf boot/.
cp boot.scr Image system.dtb image/.mkdir $TRD_HOME/vitis_wssource ~/Xilinx/Vitis/2020.2/settings64.sh
vitis &File -> New -> Platform Project from the menu.zcu106_dpu and click Next.$TRD_HOME/pl/build/zcu106_ROI_HDMI/zcu106_ROI_HDMI.xsa/.linux as the operating system.psu_cortexa53 as the processor.64-bit as the architecture.zcu106_dpu -> psu_cortexa53 -> linux on psu_cortexa53 and add the required file paths:$TRD_HOME/apu/vcu_petalinux_bsp/xilinx-vcu-roi-zcu106-v2020.2-final/images/linux/boot/linux.bif$TRD_HOME/apu/vcu_petalinux_bsp/xilinx-vcu-roi-zcu106-v2020.2-final/images/linux/boot/$TRD_HOME/apu/vcu_petalinux_bsp/xilinx-vcu-roi-zcu106-v2020.2-final/images/linux/image/Vitis-AI-ZCU106 in case you will be building the hardware platform for more than one target.cd $WORK
git clone https://github.com/Xilinx/Vitis-AI.git Vitis-AI-ZCU106
cd Vitis-AI-ZCU106
git checkout tags/v1.3 -b v1.3
git am $TRD_HOME/dpu/0001-Added-ZCU106-configuration-to-support-DPU-in-ZCU106.patchexport DPU_TRD_HOME=$WORK/Vitis-AI-ZCU106/dsa/DPU-TRDsource /opt/xilinx/xrt/setup.shdpu_conf.vh file of the Vitis-AI DPU TRD, with the one for the ZCU106 VCU HDMI ROI TRD.cp $TRD_HOME/dpu/dpu_conf.vh $DPU_TRD_HOME/prj/Vitis/dpu_conf.vhcd $DPU_TRD_HOME/prj/Vitis
export EDGE_COMMON_SW=$TRD_HOME/apu/vcu_petalinux_bsp/xilinx-vcu-roi-zcu106-v2020.2-final/images/linux/
export SDX_PLATFORM=$TRD_HOME/vitis_ws/zcu106_dpu/export/zcu106_dpu/zcu106_dpu.xpfm
make KERNEL=DPU DEVICE=zcu106_dpuThe Platform Assets Container (PAC) is a collection of boot assets that is required by the xlnx-config snap to load a custom hardware platform in Ubuntu for ZCU10x. The PAC has a defined directory structure which must be respected. The PAC structure for this example is shown below, with added support for the ZCU102 and ZCU104 boards just to illustrate how it would normally be organized:
custom_pac
 |
 └--hwconfig
          |-- custom_cfg -
          |               |-- manifest.yaml
          |               |-- zcu102 --
          |               |            |-- bl31.elf
          |               |            |-- bootgen.bif
          |               |            |-- dpu.xclbin
          |               |            |-- zynqmp_fsbl.elf
          |               |            |-- pmufw.elf
          |               |            |-- system.bit
          |               |            └-- system.dtb
          |               |-- zcu104 --
          |               |            |-- bl31.elf
          |               |            |-- bootgen.bif
          |               |            |-- dpu.xclbin
          |               |            |-- zynqmp_fsbl.elf
          |               |            |-- pmufw.elf
          |               |            |-- system.bit
          |               |            └-- system.dtb
          |               └-- zcu106 --
          |                            |-- bl31.elf
          |                            |-- bootgen.bif
          |                            |-- dpu.xclbin
          |                            |-- zynqmp_fsbl.elf
          |                            |-- pmufw.elf
          |                            |-- system.bit
          |                            └-- system.dtb
          |
          |-- <config_2>
          .
          .
          └-- <config_N>
Note that our actual PAC will have support for the ZCU106 only, so the zcu102 and zcu104 directories will
not be there. Also, folders config_2 and config_N are only there to demonstrate that we can also have
multiple “configurations” in a single PAC, although ours will only have one configuration called “custom_cfg”.
To put the PAC together, follow these instructions:
mkdir -p $WORK/custom_pac/hwconfig/custom_cfg/zcu106
cp $DPU_TRD_HOME/prj/Vitis/binary_container_1/sd_card/dpu.xclbin $WORK/custom_pac/hwconfig/custom_cfg/zcu106/.
cp $DPU_TRD_HOME/prj/Vitis/binary_container_1/sd_card/system.dtb $WORK/custom_pac/hwconfig/custom_cfg/zcu106/.
cp $DPU_TRD_HOME/prj/Vitis/binary_container_1/link/int/system.bit $WORK/custom_pac/hwconfig/custom_cfg/zcu106/.
cp $TRD_HOME/apu/vcu_petalinux_bsp/xilinx-vcu-roi-zcu106-v2020.2-final/images/linux/bl31.elf $WORK/custom_pac/hwconfig/custom_cfg/zcu106/.
cp $TRD_HOME/apu/vcu_petalinux_bsp/xilinx-vcu-roi-zcu106-v2020.2-final/images/linux/pmufw.elf $WORK/custom_pac/hwconfig/custom_cfg/zcu106/.
cp $TRD_HOME/apu/vcu_petalinux_bsp/xilinx-vcu-roi-zcu106-v2020.2-final/images/linux/zynqmp_fsbl.elf $WORK/custom_pac/hwconfig/custom_cfg/zcu106/.u-boot.elf file in the PAC. This is because we need
to use the one that is built into the Ubuntu image (the “golden” copy) located at
/usr/lib/u-boot/xilinx_zynqmp_virt/u-boot.elf. We don’t need to copy it into our PAC either, we just need to
link to it from the bootgen.bif file which we do next.bootgen.bif file with this command:gedit $WORK/custom_pac/hwconfig/custom_cfg/zcu106/bootgen.bifbootgen.bif file and then save the file.the_ROM_image:
{
[bootloader, destination_cpu=a53-0] /usr/local/share/xlnx-config/custom_pac/hwconfig/custom_cfg/zcu106/zynqmp_fsbl.elf
[pmufw_image] /usr/local/share/xlnx-config/custom_pac/hwconfig/custom_cfg/zcu106/pmufw.elf
[destination_device=pl] /usr/local/share/xlnx-config/custom_pac/hwconfig/custom_cfg/zcu106/system.bit
[destination_cpu=a53-0, exception_level=el-3, trustzone] /usr/local/share/xlnx-config/custom_pac/hwconfig/custom_cfg/zcu106/bl31.elf
[destination_cpu=a53-0, load=0x00100000] /usr/local/share/xlnx-config/custom_pac/hwconfig/custom_cfg/zcu106/system.dtb
[destination_cpu=a53-0, exception_level=el-2] /usr/lib/u-boot/xilinx_zynqmp_virt/u-boot.elf
}manifest.yaml file with this command:gedit $WORK/custom_pac/hwconfig/custom_cfg/manifest.yamlmanifest.yaml file and then save the file.name: custom_platform
description: Boot assets for custom platform
revision: 1
assets:
zcu106: zcu106cd $WORK
zip -r custom_pac.zip custom_pacTo go through these steps you will need to have gone through the previous post. Once you have your ZCU106 setup and running with Ubuntu 20.04 LTS, we can install the PAC onto it.
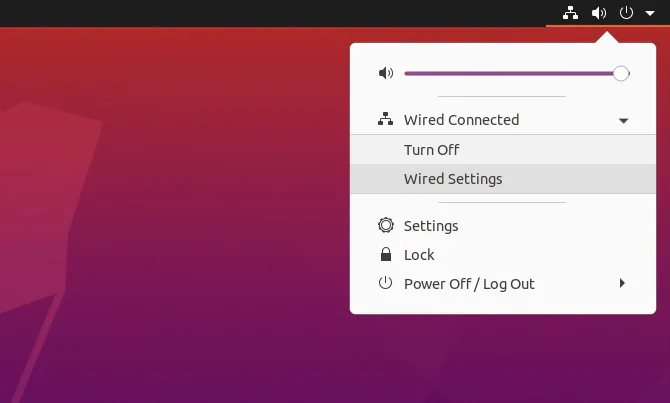
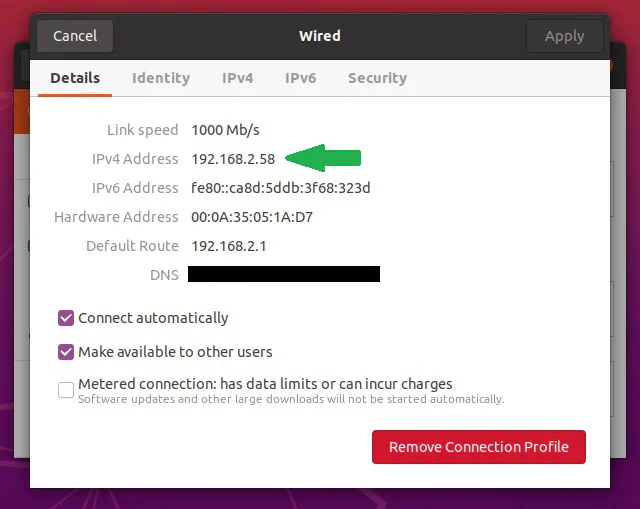
Ctrl-Alt-T.hostname -I. Alternatively it can be done in the GUI, by following these instructions.
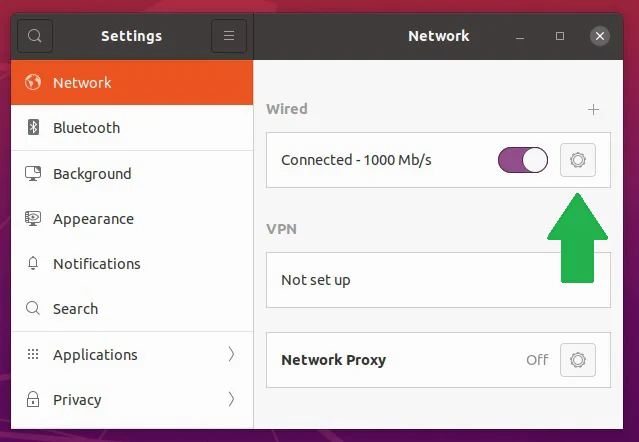
Click on the network icon in the top right corner of the screen.
cd $WORK
scp custom_pac.zip [email protected]:~/.ubuntu user.
The file will then be transferred over to the ZCU106 and into the home directory./usr/local/share/xlnx-config directory:cd ~
sudo mkdir -p /usr/local/share/xlnx-config
sudo unzip custom_pac.zip -d /usr/local/share/xlnx-config/usr/local/share/xlnx-config directory does not exist when you first boot Ubuntu, so we need
to create it before being able to copy PACs into it. PACs can go into that directory, or alternatively
they can go into /boot/firmware/xlnx-config/.xlnx-config -q. The results should be the following:ubuntu@zynqmp:~$ xlnx-config -q
Hardware Platforms Present in the System:
| PAC Cfg |Act| zcu106 Assets Directory
---------------------------------------------------------------------------------------------------------------
| custom_platform | | /usr/local/share/xlnx-config/custom_pac/hwconfig/custom_cfg/zcu106
---------------------------------------------------------------------------------------------------------------
* No configuration is currently activated *manifest.yaml file is
correctly formated. Remember that indentation is meaningful in YAML files, and you should use spaces rather
than tabs, and 2 spaces per indentation level. You also need to make sure that the property names are
correctly spelt. If you copy and paste my example above, you should not have any issues.sudo xlnx-config -a custom_platform and you should see the following result:ubuntu@zynqmp:~$ sudo xlnx-config -a custom_platform
Activating assets for custom_platform on the zcu106
* Generating boot binary...
* Updating Multi-boot register
* Updating /var/lib/xlnx-config/active_board with zcu106
IMPORTANT: Please reboot the system for the changes to take effect.sudo reboot now.Ctrl-Alt-T and run xlnx-config -q again to make sure
that the platform we built is actually loaded and active. You should get this output, showing that the
platform that we installed is active:ubuntu@zynqmp:~$ xlnx-config -q
Hardware Platforms Present in the System:
| PAC Cfg |Act| zcu106 Assets Directory
---------------------------------------------------------------------------------------------------------------
| custom_platform | * | /usr/local/share/xlnx-config/custom_pac/hwconfig/custom_cfg/zcu106
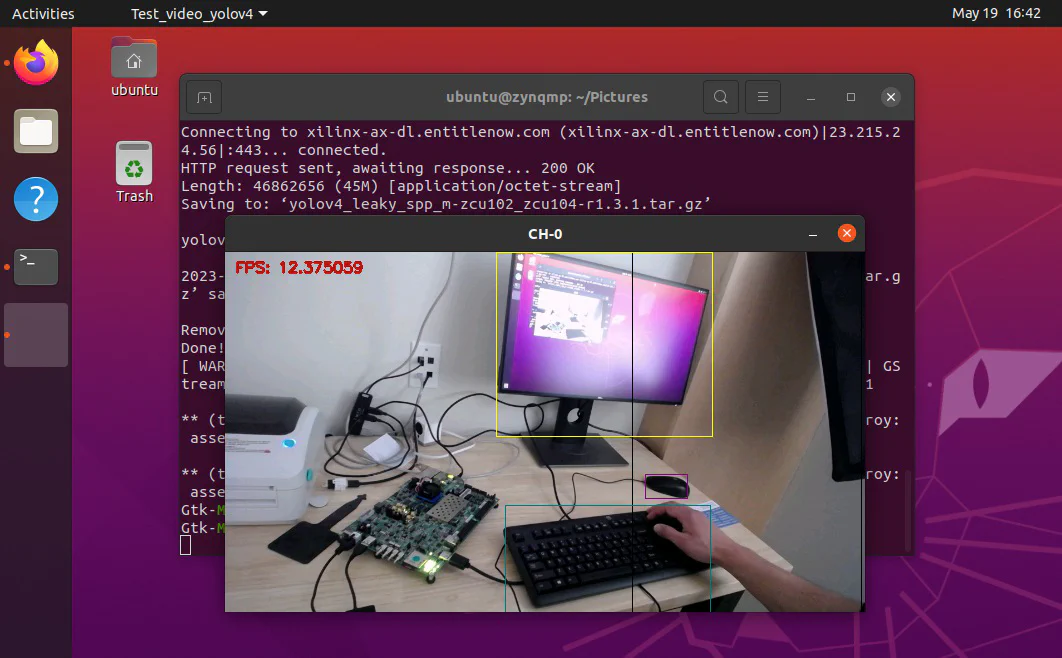
---------------------------------------------------------------------------------------------------------------sudo xlnx-config -d. Again, you will need to reboot for the changes to take effect.Like we did in the previous post, I encourage you to try out the Vitis AI Library Sample Applications to make sure that the newly built hardware platform is working as expected. We didn’t modify anything in the design, so it should have exactly the same functionality as the original.
Try this out:
Ctrl-Alt-T.xlnx-vai-lib-samples snap like this:sudo snap install xlnx-vai-lib-samplesxlnx-vai-lib-samples.test-video yolov4 yolov4_leaky_spp_m 22) is there to select the camera device at /dev/video2, so you might need to set it
to the correct one if it doesn’t work for you.In the next post we’ll modify the hardware platform so that we can run these applications on the RPi Camera FMC! Have a great weekend!